CSM Hammering
There are no mysteries involved in the act of hammering a saw. However, you must know the basic principles and apply them conscientiously. Saw hammering requires complete concentration on what you're doing. The only way to learn how to hammer is to start with a knowledge of the basics and then proceed by trial and error until you understand what happens when you hammer the saw, in all areas of the saw. The first rule to observe in hammering is very simple: do not hit a saw with a hammer unless you know exactly why you are hitting it. The second rule is to know exactly what happened where you hit it. If you concentrate on what you are doing, and observe these two rules carefully, hammering will gradually begin to make sense to you. It takes a lot of patience and a lot of time to learn the art of hammering.
You must also be aware that when you hit a saw with a hammer, you expand and stretch the metal. It is impossible to shrink metal with a hammer. The harder you hit, the more the metal expands. The larger the hammer, the more effect it will have. Also, the shape of the hammer face influences the metal expansion. You have to start out realizing these factors, and then carefully observe all the results you obtain.
This discussion will be centered around small diameter saws of 14" diameter or less. These small saws comprise 90% of all carbide saws in use today. Small saws do not require much tension if any. However, as a saw gets larger, the centrifugal force and the temperature on the saw's rim affect the body of the saw more, and create the necessity for proper tensioning.
You must have the proper tools to do a proper job. The first requirement is a test arbor equipped with a dial indicator. The next tool needed is a straightedge. With these tools, you can now determine if a saw needs to be hammered. First put the saw on the arbor and dial indicate it for wobble. Note the reading on the indicator, then turn the saw over and dial the opposite side. This will tell you if the saw is bent, or has tension areas, and how much and where. It will also tell you if the saw is dished over and not running on the center line. Now use your straightedge to check for lumps and bumps.
Now that you have determined that the saw does, or does not, need corrective hammering, you will need the other tools of the trade.
You will need an 8" round anvil slightly crowned, a three pound dog face hammer, a two pound cross peen hammer, and two or three various length straightedges. It is also advisable to have oil to wipe on the saw plate to help prevent rough hammer marks, and a piece of chalk to mark with.
At this point a few common saw terms, and what they mean may help.
|
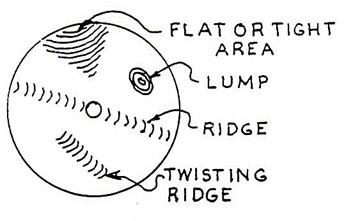
1. LUMP - This word is used to describe an area that is raised up on one side. In other words, a bump that is caused by a burned spot on the saw. Most generally it can be visually detected before you straightedge it by being blue in color. 2. RIDGE -This is a sharper bump area normally caused by an actual bending of the saw, and is long and narrow. A ridge runs from the rim to the eye of the saw. 3. TWIST -This area is the same as a ridge except it twists the saw. It is also caused by opposite areas without tension. 4. DISHED -This is self-explanatory and means that the saw is no longer on a center line, but has taken the shape of a dish. 5. LOOSE - A spot that shows light under the straightedge is said to be loose when referring to a larger area of the saw than a lump or a ridge. 6. FAST - Just the opposite of loose, or a large lumped up area under the straightedge. 7. TIGHT OR STIFF - These terms are used to describe an area that is straight or flat under the straightedge when the saw is being broke or bent over to check tension uniformity. 8. TENSION - This seems to be the mystery word used in saw hammering. It is actually a very simple function in most carbide saws. Tension is very important in large diameter saws, but in small saws the amount required is so little that in most cases it is checked merely to judge the uniformity of the saw to correct for loose or tight areas. Tension in a saw has to do with the equalizing of strain on the saw caused from the centrifugal force stretching the rim. When the rim stretches it pulls on the body of the saw. This is why the body must be stretched slightly so the rim has this stretch to compensate for. Thermal expansion of the rim or hub and cutting strain need to be compensated for by tension. If the saw does not bend with a uniform curve when broken at the center line, the tension is not uniform and the saw will have a high speed wobble. The amount of tension needed in small saws is not too great; thin saws do require slightly more tension than heavy ones. |
Now that you understand the terms used you are ready to go to work on the saw.
The first step is to apply a thin film of oil on both sides of the saw. Then locate and mark with chalk the lumps and ridges by using a straightedge. This can be done easily by holding the straightedge against the saw and looking under the straightedge at a light source such as daylight or a neon tube.
In order to level a saw, the lumps and ridges must first be hammered down with as few blows as possible. When doing this you will stretch the metal over a larger area and cause a loose spot. In the process of leveling down the bumps you also remove any tension that existed before hammering. Practice and observation are the main essentials in doing this job properly.
If you have removed the lumps and ridges and now find you have a loose area, you must mark the area of the loose spot and then direct your blows between it and the rim in order to stretch out the extra tension that exists in the loose area.
If a tight spot is witnessed under the straight edge, you must increase the tension in the tight spot by hammering that spot on both surfaces of the saw to prevent dishing the plate and to put tension in the saw.
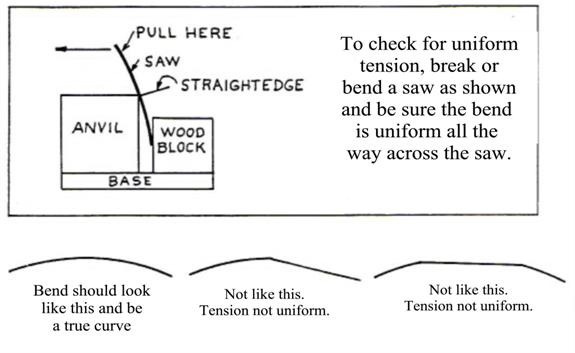
The removal of these loose and tight areas must be checked frequently and can be readily observed by bending the saw, with the center of the saw as the fulcrum or point of break or bend. (See the illustration below.) As you pull the rim of the saw down to bend it slightly you use a straightedge in your other hand and note the loose and tight spots. If a saw is properly fit up, the bend will be a uniform curve and will not show a curve on one side of the eye and a flat spot on the other. Check it in six or eight places across the center of the saw. A11 checks should show a uniform curve. If not, the tight or loose areas will again have to be worked on. Be sure to work both sides uniformly to keep the saw flat.

 |
|
| This indicates a tight eye and it must be stretched. | This indicates a loose eye and the rim must be stretched |
When you break a saw you can discover a loose or tight eye. Always hammer both sides or you will create a dish in the saw.
When the saw is flat to the straightedge and breaks over with uniform curves it is then ready to dial indicate for wobble. If your work was done properly, the saw will require very little additional work to get it to dial on the test arbor within three thousandths of an inch total dial indicator reading.
The biggest problem a saw has is heat. Heat in a saw is the result of friction. When the rim of a saw is working in a cut, heat is developed by the cutting action and by the sawdust rubbing past the teeth. This heat can cause the rim of the saw to expand and create a wobble. The heat also melts the resins and pitch in the chips and causes them to deposit on the saw. If there is not enough clearance between the plate and the tip, the gum will build up on the sides of the plate. As this gum deposit enlarges, the gum will also rub the sides of the cut. Now more heat is generated and all of a sudden the steel in one spot will get so hot it will actually turn red or blue. This causes that one spot to swell up and the gum be burned off of it. When the gum is burned off, the blue spot will cool off and shrink back away from the cut. After this point the saw is going to give trouble and must be hammered to run properly. If people would keep their saws clean a lot of these problems would not happen.
Let’s start by relating hammering to a band saw instead of a circle saw.

This area will have to be hammered to stretch it. In other words, the bump is "loose" and the flat area is "tight". By hammering the tight area, you tension it the same as the loose area and the bump goes down.

This piece has the bump in the middle. First hammer the bump down, then hammer areas on both sides of bump until flat and uniform. Again, hammer both sides of piece so the expansion will be uniform.
Serious conditions in a saw body.
 |
|
 |
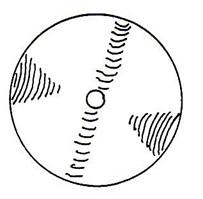
A twisted saw with the ridge down the middle will have two tight areas that must be tensioned to remove the twist. Work both sides |
 |
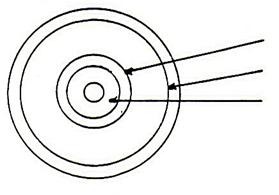
Work this area first. Work this area next. If a saw is loose at the eye in this area it must be removed by gradually working toward the rim. Both sides are a must. If you work the rim only, you will destroy the tension or pull it out of the central area where it belongs.
|
Every saw is an individual and the hammer man is confronted with the problem of analyzing; where a particular saw needs work on it. This is why it is most essential that he know what he is doing. Every man cannot hammer. If you get frustrated you will never make it and had better give up. In other words, use your head and keep your cool.
